Thursday, December 10, 2015

I Heart Makeup Salted Caramel Bar

Alright, I'm pretty convinced by now that the Pink Fizz palette I got was a dud, because the other new palette in the chocolate bar series, the Salted Caramel bar, has excellent pigmentation and is super smooth and blendable, much like the other 3 palettes. What gives Makeup Revolution? I'm particularly disappointed because that Pink Fizz palette is literally what my dreams are made of. But I digress...this isn't a post bemoaning the fact that my one dream palette didn't quite live up to my dreams. This is, in fact, a post about how good the other new palette in the series is. The Salted Caramel palette doesn't have any shadows that are particularly different from the several other palettes I own, but it is a nice palette with good quality shadows and I will definitely get a lot of use out of it.


The packaging and the names of the shadows are true to form and super cute!


I'm especially fond of the blue shade "crunch". It's the one color that really pops in this palette.


Overall this is a really nice neutral palette with a mix of shimmers and mattes. The matte black is nice to have in a neutral palette and the shimmery shades are pretty. I definitely like this palette and can see myself getting lots of everyday neutral looks out of it. Still, if I could only choose one, it would be the Naked Chocolate palette as I've reached for that more than any of the others!

What's your favorite Makeup Revolution Chocolate Bar palette? XO

Wednesday, December 9, 2015

I've Got a Major Problem...

 I'm serious you guys, I've had this problem for years now and it's not getting any better. I'm talking about my obsession with faux fur, naturally. I often feel as though I'm an aging actress who still thinks faux fur is the epitome of glamour. I can't stop. I've got coats, collars, scarves, boots lined in them and this sweater that I purchased at Forever 21 last year. I mean, it's a neutral color so the faux fur just adds that je ne sais quoi, no? Either way, my love for (faux) fur doesn't seem to be slowing down. Please, send help!


Okay, another problem? Hanging on to things even though they aren't practical. While trying to extremely pare down my closet I found this gem of a bag. I mean, when am I ever going to use a bag like this? Still, I have nothing like it so back into the closet it goes...


I love these boots, another find at the back of the closet although I don't know why I'm not wearing them ALL the time. I love the gold studs, I always like to add a bit of an edge to my outfits.

Are you guys as obsessed with faux fur as I find myself to be? XO

Tuesday, December 8, 2015

Easy Holiday Design for (Nail) Dummies

If you're anything like me then you struggle to paint your nails as it is without adding in all the fun designs. You also don't have endless amounts of time to visit the nail salon every week. I'm pretty klutzy when it comes to doing my nails but I love all the fun Christmas designs that come around this time of year. I've done a really simple easy design for you that even I can do, so keep reading!


You will need: A base coat, a blue nail color of your choice, a white nail color, a gold sparkle nail color, a top coat, nail jewels, a tiny nail (or makeup, like in my case) brush, tweezers and a cap full of  nail polish remover.


First things first, prime your nails. I like to use this OPI Infinite Shine nail primer. It dries in 2 seconds and helps your polish last.


Pick a blue polish and paint your nails. I used Juleps polish in the shade Isabela. It's the prettiest gray-blue shade that reminds me of the sky when it snows. Make sure your nails dry completely before continuing on to the next step.


Take your white nail polish and brush and draw an "X" onto your accent nail (my ring finger in this case.) Continue directly onto the next step


 While the polish is still wet, use your tweezers to stick your nail jewel into the center of the "X". I used a blue square jewel. Fill in the areas around the "X" with tiny v shapes. Don't worry about this being perfect at this point.


Take your gold polish on a tiny brush (if you use the same one clean off with the nail polish remover in between). Fill in the lines between the "X" and "v" with the gold polish like in the photo above.


At this point go in and clean up all your white polish making in more opaque and defining all your lines.


Top with a top coat of your choice. I use OPI's Infinite Shine gloss as it gives a gel type finish and helps your manicure last.


My finished snowflake. It's pretty much the easiest design you can do and if I can do it, anyone definitely can. I will note I only do one on my accent nail and only on my left hand. Because there is no way my I could do one on my right hand and have it look decent. I generally just paint my accent nail on that hand with gold glitter to add a little pizzazz!

Look at me go, two tutorials in a row! Let me know if you guys have any simple, easy nail designs you like to do this time of year! XO

Monday, December 7, 2015

Cake Pops (From Scratch)


Every holiday we end up making at least a hundred cake pops for friends and family because they love them so much. The one thing I have to say about making cake pops without using a cake pop maker is that they are super duper time consuming. However, making them all by hand makes them a million times better! Here's our method and some fun decorating ideas.

You'll need:
Cake (we use a box mix, usually in a holiday flavor like spice cake or red velvet)
Frosting (we use store bought whipped frosting)
Melting Chocolate
Sprinkles, candy and any other decorating item you choose
Lollipop Sticks
Treat bags
Ribbon
Cake pop stand
Chocolate melter (optional)
Large mixing bowl
Parchment paper
Sheet pan


First bake your cake. We used a Christmas Funfetti cake for these cake pops


Once cooled, crumble your cake into a large mixing bowl


Add in about 1/3 of your tub of frosting and mix into the cake


Mix until completely incorporated


Use a tablespoon to measure out the mix


Roll mixture in between clean hands to form smooth balls. Yes, this is time consuming but it will make the most delicious cake pops you've ever tasted. Once all your balls are rolled, place them onto a sheet pan lined with parchment paper. Then place them in the fridge for about 2 hours. This step is very important to allow the balls to form.


Once your balls are formed, melt your chocolate. We use Wilton candy melts as they come in a ton of colors and are easy to use. We have a chocolate melter but you can use the double boiler method or melt your chocolate in the microwave. Just remember not to burn the chocolate. We prefer the chocolate melter as it has a warmer setting that keeps the chocolate perfectly melted while we work with it. Take your lollipop sticks and dip the end in chocolate. Then dip the stick into your cake ball.


Once all your sticks are in your cake balls, put it back into the fridge and wait an additional 2 hours before decorating. This is extremely important, if you don't set the chocolate, your cake will fall right off the stick when you go to cover it in chocolate.


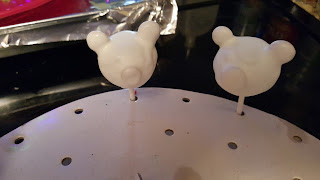
To make the polar bears, use melted white chocolate to "glue" on almond joy bites like the above picture. Use the tan colored ones so that they color does not show through the chocolate. Wait until chocolate hardens before continuing.


Once your cake pops are ready, dip into the chocolate and gently tap off excess chocolate. Set into a lollipop holder (either bought or made at home) to let dry.


Once they've cooled "glue" on little black sprinkles for eyes and noses. Use a food coloring marker to draw on a little smile.


Use sprinkles and candies to make all sorts of other designs. Once cooled completely, cover with a treat bag, tie with a ribbon and make your friends and family happy with these cute cake pops! 

This was an extremely long post so thanks for sticking with me. Let me know if you try this recipe and what type of pops you designed! XO

*Note, the polar bear idea was my husbands, he is a lot more creative (and patient) then I am when it comes to decorating the cake pops!

Friday, December 4, 2015

Weekly Roundup : Friday Faves #21

Woo-hoo, it's Friday again! It's both exciting and terrifying how quickly time is flying by lately. I'm excited for the holidays (as most of us are this time of year!) but I'm also not ready to start a New Year quite yet. Regardless of whether or not I'm ready, another Friday is here so I'm sharing what I'm loving this week.


I did a post recently on my mini e.l.f. haul and forgot to mention this foundation. I don't know how I didn't mention this as this is literally my find of the year. I don't know if it's because it's "acne fighting" or because of the ingredients in it (salcylic acid and tea tree), or maybe it's the combination of this with my current primer, but this foundation keeps me matte like no other. It literally stays on my skin all day long and I don't have the crazy amount of shine I do with most foundations. Maybe I'm hyping it up too much and it's in fact the dry time of year. Whatever it is, I'm loving this foundation at the moment! It's the e.l.f. Acne Fighting Foundation and I have the shade Ivory.


Another e.l.f. product I've been loving is the exfoliating stick in the new flavor Mint Maniac. I love this so much better than the original one, not only for the minty tingle, but also because the beads are slightly smaller making this a little gentler on the lips. I use this all the time and it's quickly become my favorite lip scrub.


These Makeup Revolution single eyeshadows were too pretty to pass up, and they were on sale so how could I not? I generally don't buy single eyeshadows but these pans are huge so you definitely get your money's worth of product. I have them in the shades (from left) Heavenly and Astral. They are really gorgeous and shimmery and I would even use Heavenly as a highlight. The consistency is like a baked eyeshadow so they're even more pigmented when wet. At about $1.50 each they were a steal!


I haven't used this eyepencil by Chella in a long time even though it's been my favorite for ages. I regrettably didn't have an eyeshadow sharpener big enough to fit until recently so it's been sitting in my drawer for months. When I finally started using it again I remembered why I loved it so much. The nude color is perfect for the waterline and makes your eyes look super awake without the same in-your-face affect that white has. It's in the shade Ivory Lace.


My last favorite is a blogger who also has a Youtube channel (as you can see from the video I've posted above!) Izzy is one of the sweetest, most encouraging bloggers out there. She's super supportive of her fellow bloggers and I was lucky enough to get to work with her on something for her blog recently. If you haven't yet, go check out both her Youtube channel and her blog (which I'll link for you) because she is super funny and posts everything from Mental Health Awareness to Beauty Reviews and Q&A's. You can find her blog here.

Those are my favorites for the week. Let me know what your loving and have a Happy Weekend everyone! XO